How do I run JupyterLab in Python?
How do I run JupyterLab in Python?

I apologize for the initial confusion earlier. Here's a detailed guide on how to run JupyterLab in Python:

What is JupyterLab?
JupyterLab is an interactive environment for working with notebooks, documents, and applications. It provides a flexible interface for creating, editing, and sharing data-rich documents using various formats like Markdown, HTML, PDF, and more.
Installing JupyterLab

Before you can run JupyterLab, you need to install it in your Python environment. You can do this using pip, the package installer:
Using pip:pip install jupyterlab
conda install -c anaconda jupyterlab
Launching JupyterLab
Once installed, you can start JupyterLab in your terminal or command prompt using the following command:
In Windows:jupyter lab
jupyter lab
This will launch the JupyterLab interface in your default browser.
Accessing JupyterLab Interface
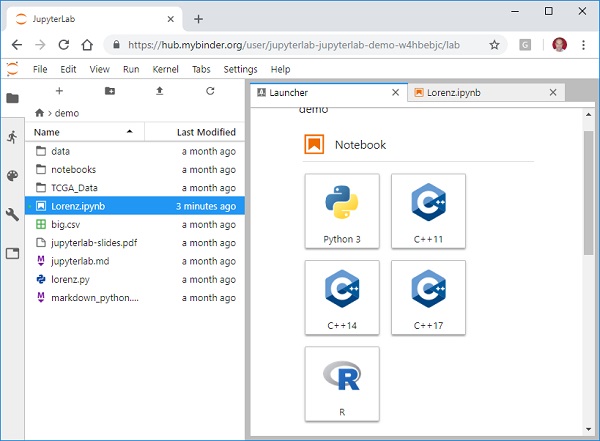
The JupyterLab interface consists of several main components:
Notebook: This is where you can create, edit, and run code cells using various languages like Python, R, Julia, etc. Files: This section allows you to view, upload, and download files from your local machine or a remote storage service (like Google Drive). Help: This menu provides access to documentation, tutorials, and troubleshooting resources.Basic Navigation
Here are some basic navigation tips to get started:
Create a New Notebook: Click the "New" button in the top-left corner to create a new notebook. Open an Existing Notebook: Navigate to your local file system or a remote storage service, select the .ipynb file you want to open, and click "Open." Edit Code Cells: Double-click on a code cell to edit it, or use the keyboard shortcuts (e.g., Ctrl+Enter for running a cell). Save Changes: Click the floppy disk icon in the top-right corner of the JupyterLab window to save your changes.Additional Tips
Here are some additional tips and best practices:
Customize Your Environment: Experiment with different themes, font sizes, and layouts to create an environment that suits your preferences. Use Extensions: Explore JupyterLab extensions to add new features like syntax highlighting for specific languages or collaborative editing capabilities. Save and Share Notebooks: Use the "File" menu to save and export notebooks in various formats (e.g., PDF, HTML) to share with others.Troubleshooting
If you encounter any issues while using JupyterLab, refer to the official documentation for troubleshooting guides or seek help from online communities and forums.
How to install JupyterLab in Python?
To install JupyterLab in Python, you can follow these steps:
Install the required packages: You need to have Python, pip (Python package manager), and conda (Anaconda's package manager) installed on your system. Make sure you're using a compatible version of Python. python --version
and
pip --version
To create a new environment:
conda create --name myenv python=3.8
Then, activate it:
conda activate myenv
Or, to activate an existing environment:
conda activate myenv
Using pip:
pip install jupyterlab
Using conda:
conda install -c anaconda jupyterlab
jupyter lab
This will start a new instance of JupyterLab in your default web browser.
Configure JupyterLab (optional): If you want to customize your JupyterLab environment, you can create a custom configuration file or set options during the initial setup process.That's it! With these steps, you should be able to install and launch JupyterLab on your system.


